With roughly one week to go before the big day, it’s time to host your second webinar dry-run.
If you’ve been following our series so far, you know we’ve been preaching the importance of holding effective dry-runs to prepare for your webinar. Getting these rehearsals organized depends upon having a solid plan in mind.
That’s why we’ve been sharing the agendas we’ve used for hundreds of webinar dry-runs. Literally hundreds.
Based on the first rehearsal of your webinar presentation, you’ve hopefully built out your webinar storyboard. Storyboarding includes:
- Drafting and dry running through your initial slide deck
- Building the Lobby and the room layouts to go along with your slides
- Creating an Event Takeaway draft
With these tasks complete, it’s time to tackle the entirety of the webinar presentation! This dry-run can take upward of two hours.

Your goal for this session is to dry-run through every aspect of your webinar presentation succinctly. And that’s on top of a few other tasks you need to complete. That’s a lot to get through in an hour or so.
To help you maximize the success of your session, we’ve pulled together all the discussion points you will need for your second webinar dry-run.
Your Webinar Presentation gets Tuned up:
Webinar Dry-Run Agenda #2
If you’re ready to crush your webinar presentation, your second dry-run is going to be very important. Check out suggestions for making it a successful session.
Here is our overview agenda you can copy into your meeting invite. These steps are explained in more detail below!
- Briefly Review Updated Slide Deck
- Dry-run through Materials & Update Layouts as Needed
- Finish with a Full Dry-Run, Minimally Pausing
- Select & Enable Audio Preferences for Participants, including VoIP & Integrated Audio
- Set up “Place Participants on Hold” with a Message about When the Webinar will Begin
- Review Takeaway Draft & Discuss Edits Needed for Next Phase


How to use this Webinar Dry-Run Agenda
These agenda points were chosen for a very specific reason. I’m going to take you through each point to expose the value and purpose.
Please note that many of our suggestions hinge on a few things:
- We use Adobe Connect for Webinars
- We believe Adobe Connect offers the most immersive experience for our audience, so we use it for every webinar we host. Not all webinar platforms share the same feature set, and Adobe Connect tends to offer more functionality than its competitors. Keep this in mind.
- We use Integrated Audio during Webinars
- Webinar platforms offer VoIP as a default option for voice and audio. VoIP is a good option for webinars, as you’ll mostly be broadcasting audio. But the bandwidth suck of VoIP can affect the overall quality. By integrating telephony, you eliminate bandwidth problems – and give audiences the opportunity to use their telephone or computer speakers to listen in. That’s why we always use our proprietary audio integration.
#1. Review Updated Slide Deck
At this stage, you should have 90% of your slide deck’s text and formatting complete. Review each slide to make sure the text supplies an appropriate amount of information. You can’t have a true dry-run until you’re satisfied with the info your speaker will present.
Don’t take more than 10 minutes to review. As they say, you have bigger fish to fry during this second dry-run.
Take this time to evaluate the coherency of the webinar.
- Do the transitions make sense?
- Are the discussion points cohesive with the larger presentation?
- Are you doing enough to drive audience engagement in relation to your discussion sections?
(Jump back up to the agenda, or keep scrolling down.)
#2. Dry-Run Through Materials and Update Layouts
After you’ve tackled your slide deck, you’ll need to dry-run through your materials. Focus on the Layouts you’ve developed. Each Layout should serve to maximize the value of the information being delivered. Consequently, if your slides have changed at all, you’ll need to reevaluate your Layouts.
This is one of the most important steps in preparing your webinar presentation.
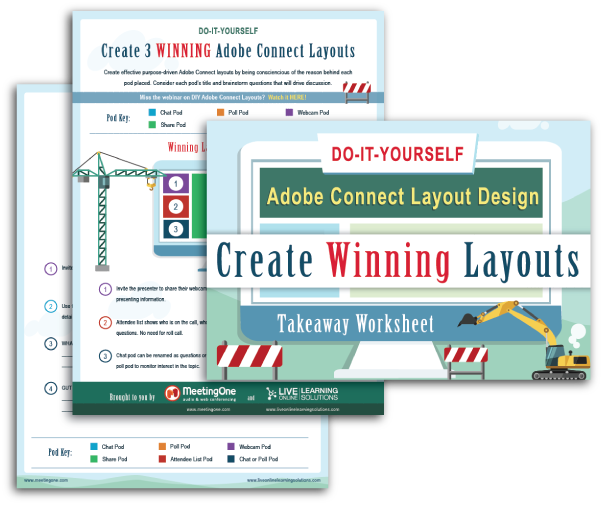
Although it is easy to cram your Adobe Connect Layouts full of engaging chats and polls, it’s best to let the content guide you. Get our worksheet “DIY Adobe Connect Layout Design – Creating Winning Layouts.” We’ll help you develop an eye for design.
(Jump back up to the agenda, or keep scrolling down.)
#3. Select & Enable Audio Preferences for Participants
Selecting the right audio options for your webinar is essential—but often overlooked. Most webinar platforms come with VoIP. But there are alternative options to VoIP, such as integrated audio, that provide better call quality.

Evaluate your audio options! Get more information by checking out our “Audio Options Checklist.”
As a best practice, enable both VoIP and telephony in your room. This ensures that all your attendees will have no issue hearing your webinar.
If you’re thinking you want to integrate audio, learn how easy the process can be with our blog, “Setting Up MeetingOne Audio Integration for Adobe Connect in 3 Simple Steps.”
(Jump back up to the agenda, or keep scrolling down.)
#4. Set Up “Place Participants on Hold” Message
The last thing you want is someone to see your virtual room before the day of the event. There may be final modifications you need to make, and if nothing else, you wouldn’t want to have them thinking the event is already taking place…and be utterly confused (or bored!).
To help avoid this issue, you will want to manage your virtual room settings to keep people from joining early. Doing so a week before the webinar is advisable, as it gives you plenty of time to secure the room before anyone tests the URL. When you add the setting, make sure to include a message.
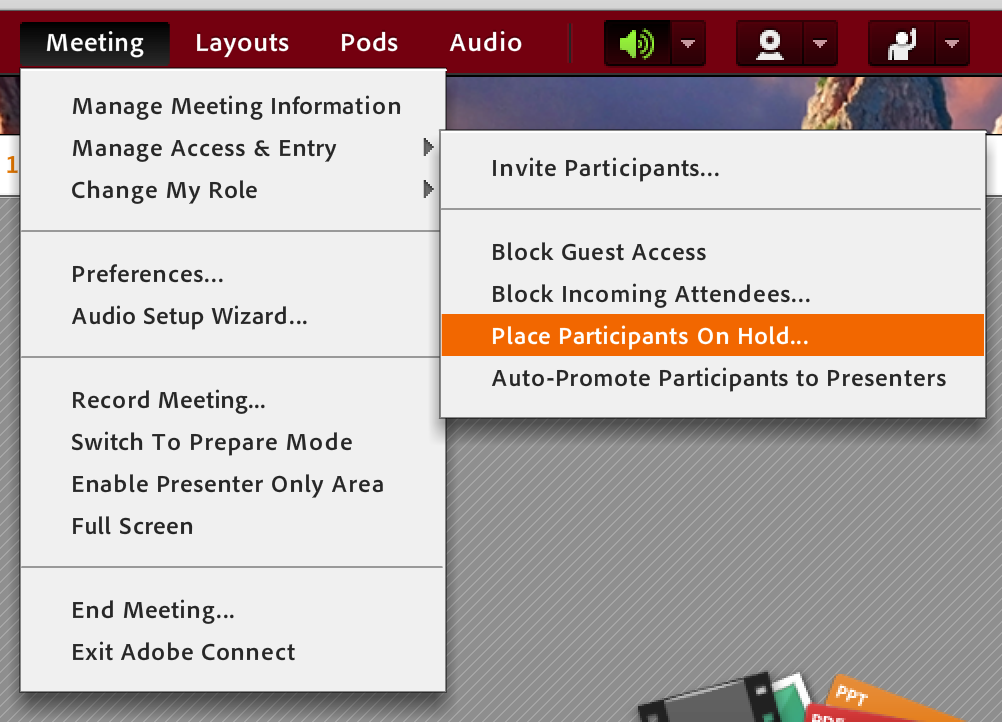
Adobe Connect makes it easy to put attendees on hold. From within your virtual room, you click on the Meeting Tab at the top. Track down and hover over “Manage Access & Entry.” A new list will appear. Go to “Place Participants on Hold.”
This tool also provides you a text box where you can put your message. Once you save the message, you’ll have to go back in and click “Okay.” Until you start your webinar, everyone but your speaker and hosts will be on hold.
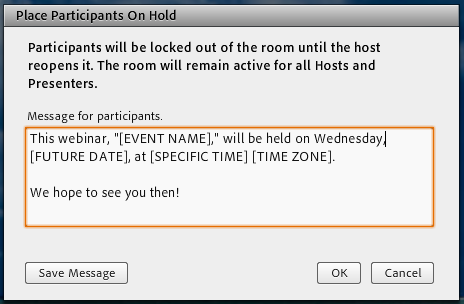
In your message, include the following:
- The day, date and time of your webinar (don’t forget to include the Time Zone)
- The full name of the webinar
- A friendly note to your participants thanking them for their interest in attending
(Jump back up to the agenda, or keep scrolling down.)
.
#5. Review Takeaway Draft and Discuss Edits Needed
With your webinar takeaway crafted before this dry-run, take ten minutes or so to discuss any edits that may be needed.
While you evaluate your takeaway, keep these questions in mind:
- Does your takeaway truly capture the purpose of your webinar?
- Are the tone and voice consistent with the webinar?
- Are the images congruent?
- Does your takeaway provide added value to the webinar’s message?
(Jump back up to the agenda, or keep scrolling down.)
.
#6. Finish with a Full Dry-Run
A full dry-run should come last on your agenda. It’s impractical to dry-run through the entire webinar presentation if you’re not content with how your information is being portrayed. Also, revisiting your slides and layouts will help your speaker keep track of the places where they want to add emphasis or open things up for discussion.

Take note of the places where the content seems dull, interactive pods can be added, or graphics may need to be modified. These records will provide you the information you need to make final revisions to your webinar presentation.
This is the most important part of the second dry-run. Don’t skimp here or you may hurt your webinar presentation.
(Jump back up to the agenda, or keep scrolling down.)
Preparing for the Next Webinar Dry-Run
There’s always more work to do when readying a webinar. It’s at this stage you need to start planning for the technical preparations of your webinar. You may want to evaluate webinar production services available to you. Allowing a certified producer who understands the webinar platform to manage the logistics of your webinar, may prove to be a tremendous benefit.
Before you hold your third and final dry-run, make sure you’ve completed the following related tasks:
• Finalize Your Slide Deck
The feedback you received during your webinar dry-run should be enough to make final revisions to your slide deck. Revise based on the conversation you had with your speaker.
Make sure your formatting is consistent, images are abundant throughout the presentation, and the text styles are the same.
• Complete the Webinar Takeaway
You’ve received notes for the webinar takeaway, now change as needed. Make sure you’re incorporating images or illustrations that relate to the webinar and are customized to reflect your business. Design your own illustrations, or go with unique pictures.
As best you can, avoid stock-y images. There’s a reason they decided to call their business Death to Stock.
Get the agenda for your 3rd & final webinar dry-run!
We help you take all the steps necessary to finalize everything for your webinar! We’ve got the ideas you need to perfect your presentation and delivery!


If you’re interested in hosting more engaging and immersive webinars, maybe its time to step up to Adobe Connect Webinars!
We can create a solution for you that pairs Adobe Connect with training and production assistance!
Tips, tools, and tricks – everything you need for your webinars, just subscribe to our blog!
This blog was originally published on February 7th, 2017.