Being in Marketing, I dabble. Blogs, social media, emails, eBooks, trade shows…and I may or may not spy.
I may or may not trial competitors’ products with the sole intent of learning about them. Call it due diligence. Call it espionage. It may or may not be accurate.
I’ve noticed that many of the trials of competitor products – I may or may not test – come with extensive resources. Tutorial videos, how-to guides and the like. All great assets! All valuable for learning the ins and outs. And we here at MeetingOne offer them, too.
Many, though, are geared more toward teaching you how to perform basic actions. “Here’s how to use this feature.” “Follow these steps to create an event.” Not enough of these resources are designed to teach you how to use a platform in a holistic way.
So, I thought it would be fun to create a blog that does both. To help you assess AudioOne during your free conference call trial, this blog will run through features and their immediate value, while also tying things together. All with semi-absurd examples. Gotta keep things light! Who knows, you may find that adding a pinch o’ spunk will improve your trial and make your conference calls more engaging!
(Note: Many of the features described are only available with MeetingOne. If you haven’t already started a free AudioOne conference call trial, you can begin a trial by going here.)
Try these 10 Things during your AudioOne Trial
Assessing a conferencing platform can during a conference call trial can feel overwhelming. You often only have two weeks to explore the admin portal and the web-based interface – on top of testing the call quality and reliability. If you can’t see how certain features serve the larger picture, the point of a trial is kind of self-defeating.
So, I’ve broken out the things you should test into 2 categories: OAM (our admin portal) and Click&Meet (our web-based interface). Hopefully, that simplifies things! Or, you can download an easy-to-use printable guide here!
Make sure you have your login information on hand – you should have received it in an email from us shortly after signing up.
OAM
Let’s start with OAM – log in there first. Our Online Account Management portal (OAM) serves many functions. While trialing OAM, you will be an Account Admin, which gives you the ability to add users and rooms. You can also create your own space for conference calls.
The following 5 things to do will help guide you through OAM! (Remember, these examples are just for fun, so don’t take them too literally.)
#1. Create a Par-taaay Room!
Let’s start your trial off in style with a room dedicated to just having fun conversations. (You do have 30-days worth of free conference call minutes to use – so why not!)
It’s going to be great. You can give your room a fun name, set the room up to your liking, and then give people the dial-in information and host your first call! Let’s do it!
Here’s how to create a room (you can also watch the video below):
- Select the “Create Room” button your “Home” tab.
- Enter your name and email.
- Unselect the radial button that says “Send Host Room Info.”
- Select Save.
- Jump into the room by clicking on the hyperlinked number.
You can create as many rooms for yourself as you would like! It’s no joke. We’re talking about an unlimited amount. This first one can be dedicated to fun calls. You can create a second for serious conversations just as easily.
Now that we’re in the room, you’ll want to manage some of the room settings. To so so, simply select the Settings tab. Here are some settings worth adjusting:
- “Max Inactive Time”: Don’t let people sit in your call if you’re not present for more than 5 minutes.
- “Wait Alert Delay”: Alerts you when people are slow getting into your call – consider 120 seconds!
- “Maximum Duration”: All good things come to an end, as should your calls. Consider 90 minutes.
If you want to create rooms for other folks in your company, you’re going to repeat the same process. Except for two things:
- Select the radial button “Send Host Room Info.”
- Input their contact information instead of your own!
The folks you set up with a room will receive an email like the one you initially got. It will provide them login info and access to OAM and C&M. Within OAM, they will be able to manage their own contacts, recordings, reports and some of the room settings. Then, they can test out their audio room!
#2. Give a Teammate a Creepy Pass Code
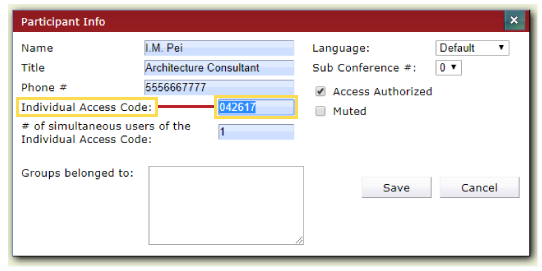
While you’re still in the room, we’re going to have you add a contact and give them a unique passcode called an Individual Access Code (IAC). But let’s make it fun. Give them a creepy passcode.
First, you have to create a contact. To add a contact:
- Go to the “Directory” tab.
- Select “Add” under “Participant Management.”
- A new window, “Participant Info,” will pop-up.
- Here’s where you can define the IAC. Just enter your chosen number in the form field next to “Individual Access Code.”
- Enter the rest of the info and save! That’s it!
Alright. Back to the passcode. Birthdays seem like a good option. Go the six digit (DDMMYY) route. Other dates, like when you first met, will do the trick, too! Both show you care…maybe a little too much… 😉
You can always string together a series of unlucky numbers, too:
- 131313
- 232323 (if that Jim Carey movie left you shaking your head)
- The mark of the beast – 666 – probably takes it too far, and that’s not a very difficult code to guess.
While it’s not necessary to creep out your teammates, the key idea here is to create IACs for your contacts. This is very important because the IAC serves multiple purposes.
- You can set your room security so only callers with IACs can join.
- IACs are used to identify callers in our system.
There’s a lot of value here because contacts can call in from any number and will still be IDed by our bridge.
Now, you have a contact to call from your Par-taaaay Room! We’re making good progress.
(Note: IACs will be automatically generated by our system for contacts, so don’t stress about coming up with codes for everyone – especially not during your free conference call trial. You can do that after you purchase AudioOne!)
#3. Fort Knox Your Conference Call
Everyone knows of Fort Knox. You can probably imagine it in your mind: Fences with razor wire, checkpoints with armed guards, four-foot thick walls of granite, blast-proof front door, and reinforced steel vault that is nearly impenetrable. All to store billions of dollars in gold bullions.
Let’s do the same with your conference calls – on a virtual level! Let’s Fort Knox your audio room. This will help secure your calls.
(Seem a bit extreme? It’s actually quite surprising how vulnerable your conference calls can be. There are people out there actively trying to sneak into conference calls – read more about it here.)
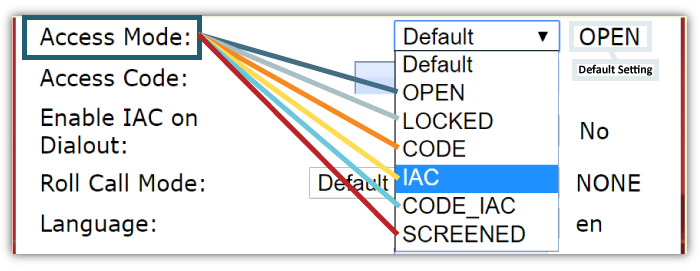
Fortunately, creating a super secure audio room is surprisingly easy. OAM offers you multiple options for securing your calls. You can add passcodes for entire groups (“Code”) or create unique codes for individuals (“IAC”).
Or, you can simply lock your conference (“Locked”), which is what we will do here.
When your room is locked, it is completely sealed off from the outside world. People can only join the call if you dial-out to them.
Setup is very easy.
- In OAM, go to “Settings.”
- In the right column, scroll down to “Access Mode.”
- Select the drop-down menu.
- Select “Locked.”
Now, hop over to Click&Meet. (It requires the same username and password as OAM.) Use the dial-out tool to reach your desired callers. Either use the dial-pad to ring them up, or search for them in the built-in directory!
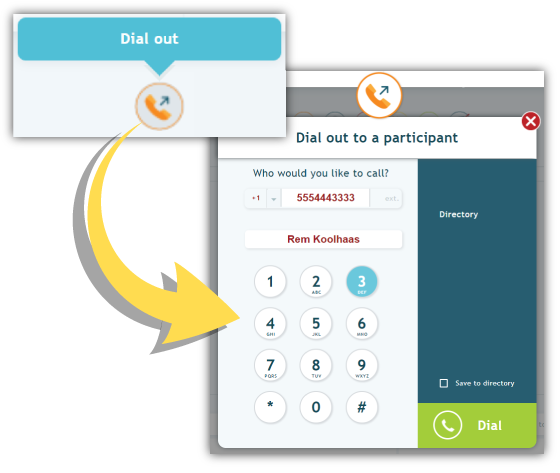
(If you already loaded all of your contacts into OAM, you’ll see their info in the Directory feature. You can add new contacts as you go, too.)
It’s that easy. Now, you have a secure room for your most confidential calls!
#4. Make Your Work Bestie a User
We’ve built AudioOne to serve organizations of all sizes, but we see a lot of enterprise companies use it. They like the flexibility to provision many users who can each manage their own conference calls.
Let’s do so now. Pick your work bestie and make them a user:
- Select “User Profiles” (far right tab).
- Select “Create User” at right.
- Enter their contact info and give ’em a password (I’m thinking 131313).
- Hit save!
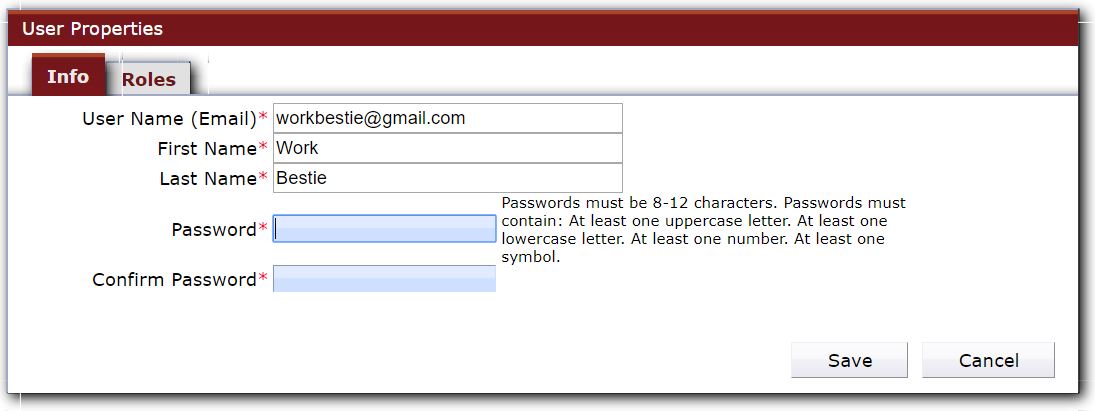
They’ll be created as Product Admin.
You can always change your Work Bestie’s privilege level. Maybe power gets to their head, so you have to rein them in. Well, you can always change their role from “Product Admin” to “End User.” They will still be able to hold conference calls. The biggest difference is how much control they have over call settings.
Changing a User’s privileges is easy enough. To do so, start in “User Profiles” again:
- Click on the hyperlinked name of your chosen User.
- A “User Properties” window will appear.
- Select the User and then click “Add.”
- Select “User – Product Level,” then OK.
- Lastly, Select the “Admin – Product” role and click “Delete.”
- Save!
This will make them a “Room User.”
Your work bestie can now manage every aspect of their calls! (Make sure they thank you.)
#5. Book a Call for 500
While you might not ever need to make a call with 500 people, you easily can with MeetingOne. While our rooms are set to allow for 150 participants by default, it’s no trouble for us to scale up to calls with thousands of people. (Learn more about our flexible call capacity in this blog.) All we ask is that you give us some notice.
While you’re trialing AudioOne, why not place a reservation for a large call? Doesn’t have to be 500, but if you have a large call coming up, it seems pretty smart to try it out during the trial.
To request a large call reservation:
- Go to the “Home” tab.
- Locate the “Reservation Request” button at right. Select this button.
- A new browser window will open requesting you complete the reservation form.
- Enter your info and Submit!
Hosting at least one large call during your trial will give you a better appreciation of AudioOne’s bridge.
Let the conversations begin! Onto Click&Meet.
Click&Meet
Everyone knows that conference calls can be difficult to host. Maybe it’s background noise disrupting the conversation. Or, it could be people talking over each other.
Click&Meet was designed to resolve these issues. It’s a visual interface that uses web-based controls to give you the ability to manage your calls from your computer. You can mute and un-mute callers, move callers into Q&A queues, and see who’s talking!
Using Click&Meet during your conference call trial is huge! You will greatly appreciate the added control it gives you over calls. (Expect more productive, engaged conversations!) Follow these 5 strategies and you’ll get a better sense of the platform.
#1. Skip OAM – Set up Access in Click&Meet
Well, I’m a jerk. I made you reinforce your conference call with blast-proof, 27-inch steel doors…only to then let you know you can manage access in Click&Meet. That’s my bad.
It’s still important to know. Access requirements for a call can change last minute.
The Click&Meet system gives you a straightforward process for doing so. Takes any complexity out of it!
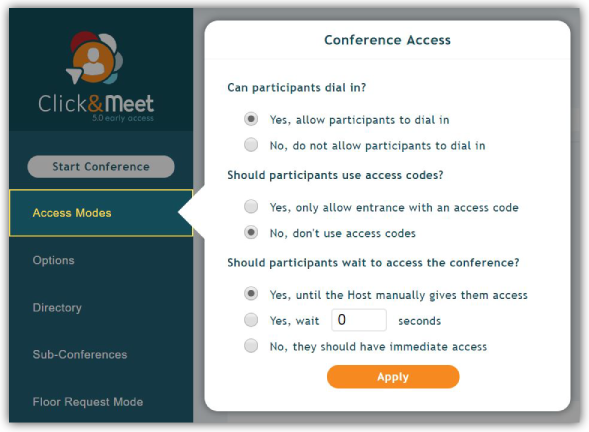
- Click “Access Modes” in the column at left.
- Allow users to dial-in (we already know how to Fort Knox a call).
- Require callers to use a code to enter.
- Have them use an access code of your choosing.
- Hit “Apply”!
Alternatively, you can screen callers before they join. Slight difference:
- Choose “No, don’t use access codes.”
- Stick with the default setting requiring you – the host – to give access.
Now, you can change access last minute!
#2. Warm-up the Vocal Cords
It was maybe 3 months ago that I joined a webinar where I could hear all of the hosts discussing their plans for the session. Yes, I was a bit early to the show, but it still caught me off-guard.
A similar issue can arise during conference calls. Last minute preparations often need to be made, but doing it over the main conference line isn’t a good choice.
So, before your next call, I would encourage you to use a sub-conference room to hold pre-call talks. And work out those windpipes! Doe, a deer, a female deer…
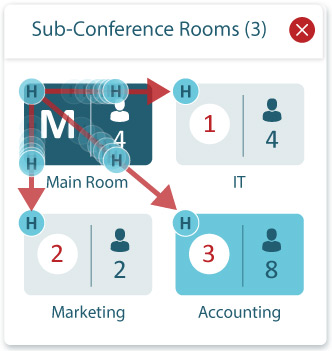
You can follow these steps to operate sub-conference rooms (or just watch the video below):
- Select “Sub-Conferences” in the left column.
- Pick the number of rooms you need – breakdown by the number of teams on your call.
- Click “Open Rooms.”
- You can then drag and drop callers into a sub-conference room, or right-click and assign them to a sub-conference room.
To close the sub-conference rooms, simply click on the red X at the far right.
Once you have your pre-call team in the sub-conference room, feel free to belt out your favorite song! …Or, discuss the plans for the call. Whatever is more appropriate.
#3. Whisk away Callers for Secret Talks
In this section, we’re going to talk about a few features: The Wait Alert Delay and the Host Corner.
As you can imagine, people sometimes struggle to join calls with access codes. If they forget the code, they are going to have a heck of a time getting in.
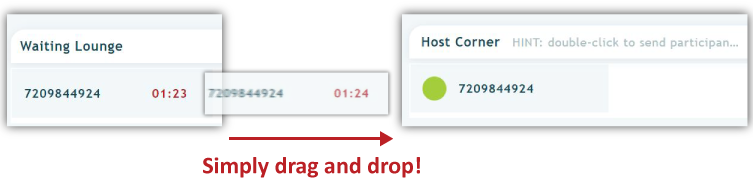
Remember that Wait Alert Delay we set earlier? Well, if a caller is having difficulties getting in, their avatar in the Waiting Lounge will be flagged after the alert is activated. It’s very obvious, so you’ll know if something is up.
Now, we come to the “Host Corner.” This is a unique feature to Click&Meet. The Corner allows you to drag callers away into an isolated space. The talks you have in the Corner won’t be heard by anyone outside.
The Corner is the perfect place to screen callers coming into the call. For those folks who have been flagged in the Waiting Lounge, drag and drop them into the Host Corner.
Ask them what’s up, and make sure they belong in your call. If they were just forgetful, you can let them join the main conference room. As they say, All’s well that ends well.
Now, of course, you can use the Host Corner for secret conversations. I would encourage you to pull at least one caller out the Waiting Lounge for a discrete meeting. Talking in code is best.
#4. Get Philosophical with a Small Group
We’re headed back to sub-conference rooms for this next thing to do. This time around we want you to get deep with some of your callers. Best way to do this in small groups.
You already know how to open the sub-conference rooms. This time, we’ll explain how to move from room to room as a host.
It’s very simple. Once you’ve opened your rooms, select the Host Icon – the H in the blue circle – and drag it to the sub-conference room of your choice. You can bounce around from room-to-room at will! So, pick your room and start asking the big questions.
There are many important questions that we have to ask. Here are a few of the most philosophical I would suggest you discuss:
- “Who closes the bus door once the driver gets off?”
- “If two mind readers are reading each other’s minds, whose mind are they really reading?”
- “What is a thought?” …No, that one’s lame…
#5. Tear down the Tyranny of Endless Monologuing
Here are some great movie monologues (read at your leisure):
- A Few Good Men – “You can’t handle the truth“
- Network – “Mad as hell“
- American Beauty – “Beauty in the world“
You know when monologues aren’t great? During conference calls. In fact, they can be downright excruciating.
In my opinion, conference calls should serve as a time for collective discussions, not talking heads. From what we’ve observed, group input seems to lead toward better experiences and outcomes. Callers are more likely to retain the key points of presentations if they have the chance to engage the ideas.
Unfortunately, it often feels difficult facilitating these types of conversations without it descending into chaos. Dozens of people talking over each other isn’t desirable. What can be done?
Our solution is an easy to use Q&A tool, “Floor Request Mode.”
Floor Request Mode allows callers to move into a queue to ask questions. More importantly, the Q&A shows up in Click&Meet. You can see who’s in the queue and have the ability to sort and skip callers. After a question is asked and answered, the host can quickly move on to the next caller.
Here’s how to start and use the Floor Request Mode (video below):
- Click on “Floor Request Mode” in the column at left.
- A message will play over the line telling callers how to participate – press Star then Pound (* then #)
- Callers will move into the queue.
- You can then select the order by dragging and dropping callers, skipping a caller, or using the “Move” button.
- To pick the first caller, you can drag and drop them in the space provided or click “Next Participant.”
That’s it! It’s very easy to start a Q&A in Click&Meet.
Break up endless monologues and lectures! Please, pretty please, give your callers the mic at least once during your free conference call trial. The results will speak for themselves.
Make the Most out of Your AudioOne Trial!
There’s a lot to explore during your conference call trial with AudioOne. The above examples, while silly, hopefully gave you some insight on all you can do. Do download the instructional guide for using these features – it’s straightforward and free of bad jokes.
Make sure you bookmark our resource pages for Click&Meet and OAM – they have everything you need. And if you have questions, feel free to contact our support team during your conference call trial!
While you’re testing things out, why not also explore Adobe Connect? You can use the platform for your meetings, trainings or webinars. And our Audio Integration – that uses the same bridge as our conference calls – pairs perfectly with Connect. You’ll get the call quality and reliability that’s sorely missed with VoIP.
See it in action!