It’s hard to imagine online meetings without webcams these days. Video helps to humanize virtual interactions and strengthen discussions. Adobe Connect webcams make the most of webcam on several fronts:
- An unlimited number of webcam feeds can be pulled into the room – the industry’s most.
- Pod management allows you to place your webcam anywhere
- Multiple display formats provide the ideal viewing experience
- Video quality can be defined to achieve optimal bandwidth consumption.
Here, we offer you guidance for making the best use of your Adobe Connect webcams.
Basics of the Adobe Connect Webcams
Add webcams to your Connect room layouts whenever you need them. Select the Pods tab on your menu bar, scroll down to Video and select.
Using the Adobe Connect video pod is very straightforward. In the top right corner, click on the menu, scroll down to Select Camera, pick the one you want to use, and then select “Start My Webcam.” (You can do so from the menu or with the big button in the middle of the pod.)
You’ll have the opportunity to preview what everyone will see. Once you’re comfortable with the light and angle, select “Start Sharing.”
As long as you’ve enabled webcam for participants, everybody will be able to start their webcams in Adobe Connect as easily. Double-check by selecting the drop-down menu beside the webcam icon in the top bar. Near the bottom, you’ll see an option that reads “Enable Webcam for Participants.” If you’re good, a checkmark will sit beside the phrase. If not, select it, and you’re set.
(You can disable webcams for all participants except for a select few. Follow the process for disabling webcams. When your meeting starts, select a participant in the attendee list, and a pop-up menu will appear. You can then choose “Enable Video.” They will be able to share their video.)
You can bump webcam sharing up to full screen (the entire space of the screen) or maximize (total area of your Adobe Connect room).
At any time, you can pause your webcam. In the bottom left corner, you’ll see a little pause button. Select it, and your frame will freeze. Make sure to smile before you do so!
Stopping your webcam is just as easy as starting it. When your webcam is running, you’ll see a button that says “Stop” at the top. Click it, and your feed will cut. So easy!
So you know, hosts can pause or stop participant webcams at any time.
Lastly, the Adobe Connect video pod makes it easy to format the layout of group webcam feeds. Say you have ten people on webcam. You have two options for how you want these webcams arranged:
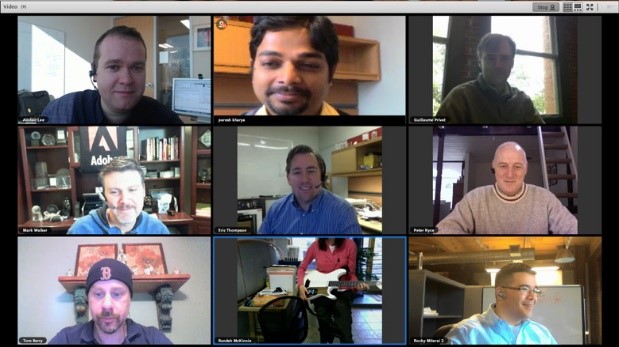
- Grid: Gives every webcam a fair portion of the pod space. (The first image below.)
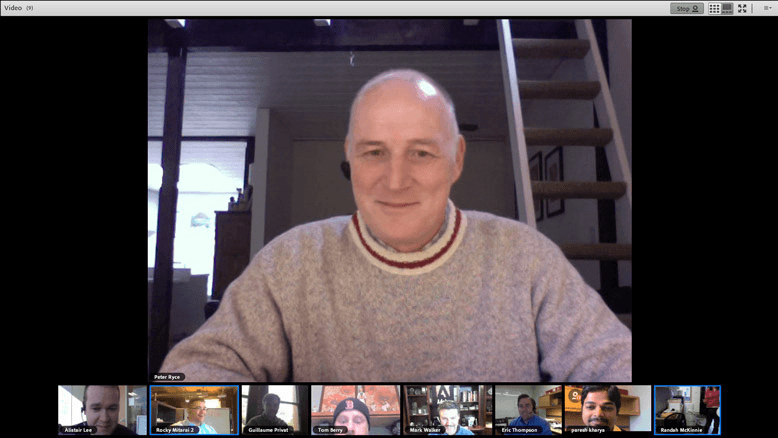
- Filmstrip: Places one speaker above the rest, who appear below. (The second image below.)
The Grid format is terrific for daily meetings and collaborative sessions. Everyone gets an equal segment of the space – and the opportunity to participate.
Film Strip can be better for large group meetings or events where presentations are given. As they lead a session, one person’s webcam is assigned a larger share of the screen. Anyone can be selected for the primary position in Filmstrip. And as a host, you can scroll through the participants in the film strip without affecting the webcams. (Webcams “off-screen” will automatically have their feeds paused. Saves on bandwidth.)
Hosts can switch between the two layouts as needed.
These are the essential aspects of the Adobe Connect webcams.
Optimize the Adobe Connect Video Pod
In the next section, we’ll share a few tips for making the most of webcams in Adobe Connect rooms!
Optimize for Bandwidth
Webcams can be a significant suck on bandwidth. This is especially true if you feature many participant webcams at once. Adobe Connect video pod allows you to pull in an unlimited number of webcams, so bandwidth management is critical.
Fortunately, Adobe Connect makes it easy to adjust the video quality for webcams. The higher the quality, the higher the bandwidth consumption. The lower the quality, the lower the bandwidth demand.
Here’s how to optimize bandwidth consumption:
- In your Room, select the Meeting tab at the top.
- Find and Select Preferences.
- A new window will appear.
- In that window, you have several options.
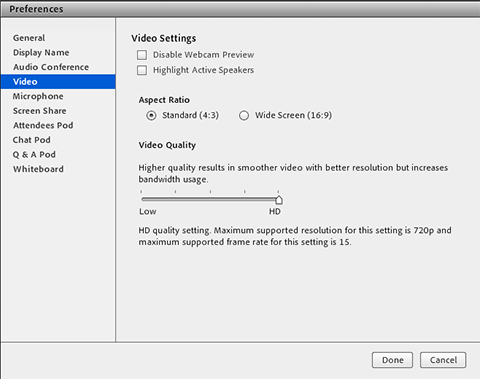
- Looking in the left column, choose “Video.” You should see “Video Settings.”
- Locate the “Video Quality” slider. You can then set what level of quality you want. Low is 120p, 4 frames per second (fps). High Def is your 720p, 15 fps.
(The second from Left, Medium, features 240p & 8 fps. In the middle, the Standard setting is 240p & 10 fps. The second from right is High, which is set for the minimum threshold for HD, 480p & 15 fps.)
How do you choose? It all depends on your event. If you’re leading a meeting and will be featured in the Film Strip mode, you may want 720p. The better quality will reflect well on your presentation.
In another scenario, if you’re leading a webinar or training in which you plan to place your webcam in the corner, you can get away with sliding your quality down a notch. These events tend to be driven by the content delivered, not the “face-to-face” interactions webcams offer in the virtual space.
The more participants you have on webcam, the more reason you have to lower the quality. Keep in mind that 120p is pretty low. So, you might want to avoid choosing the lowest quality setting except for times of really high bandwidth consumption.
It’s also important to note that Film Strip Mode takes up less bandwidth than does Grid.
Be sure to consider whether you need to optimize webcam bandwidth for your events in Adobe Connect!
Optimize for Presentations
The Adobe Connect video pod makes it easy to improve video presentations. There are a few features that you will want to consider:
- Highlight Active Speaker
- Force Presenter View
Highlight Active Speakers
In the video settings, you’ll see a little box next to the phrase “Highlight Active Speakers.” The name indicates the functionality perfectly.
Every time an individual speaks, Connect will outline their webcam with a blue highlight. The same is true when multiple speakers are talking.

The example above features two active speakers!
Force Presenter View
When a host or presenter is speaking, you can require that everyone viewing will share the Host or Presenter’s view settings. It’s a better way to add some control to your webcam experience.
This is important when a host or presenter has maximized the video pod or extended it to full-screen. Participants then must view the webcam in the context defined by the host or presenter. On the flip side, if a Presenter sets it to Force Presenter View and maintains a small view of the webcams, a participant can’t maximize the pod.
There are times in many large meetings and events where you need that type of control. It ensures presenters can deliver their presentations as they see fit. It also works well during group discussions when you want everyone to participate in webcam-based conversations.
Webcam Alternatives
We already talked about the settings we use to manage bandwidth within Adobe Connect’s preferences. There are other ways to manage bandwidth consumption related to webcams.
Swap in a Picture
Rather than add a video pod to your Adobe Connect room, place a small share pod. Position and size it to your specifications.
Then, upload a professional picture into the pod! Thanks to Connect’s persistence, that picture will be there as long as you desire.

We like this alternative because the audience gets to see your smiling face – but you don’t have to feel the pressure of jumping on webcam.
At MeetingOne, we developed virtual business cards in Photoshop. Many members of our team use them as substitutes for a webcam. Here’s an example from my boss’s room.

Exclude from Certain Layouts
During webinars and virtual training, it can be a wise choice to run webcams intermittently. Rather than turn off your webcam during sections where you want to focus on slides, videos, or interactive elements, simply create a different layout that excludes the Adobe Connect video pod. Then, reintroduce webcams later.
When you transition between layouts, the webcam will reappear when it’s most pertinent to your content!
We often do this during our webinars. Here’s an example from a “Virtual Christmas Party” we put on a few years back.
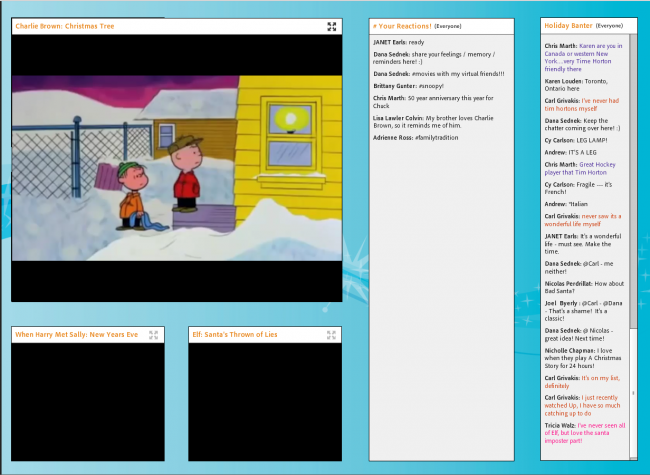
We were running multiple videos at once. So, to reduce bandwidth conflict, we cut out the webcams for that section. After the videos, we reintroduced webcams. The transitions were clean. And the event flowed smoothly.
Optimize Your Entire Adobe Connect Experience
Use these pointers to make the most of your Adobe Connect webcams. Making good use of webcams in your Adobe Connect rooms can lead to better presentations and events!
Using Adobe Connect is half of the equation. The reseller you work with also plays a vital role! There’s only one Partner who’s been named Adobe Connect’s top support provider. And only…
MeetingOne has been named Adobe Connect Partner of the Year 3 times in 4 years!
![]()