Adobe Connect webinars offer users the ability to create events that are fully customizable, immersive, and highly engaging. No other platform can replicate the experiences participants enjoy during Adobe Connect webinars.
Yet, there’s one tool sure to enhance your Adobe Connect webinars: The Click&meet audio management companion for Adobe Connect.
Click&Meet was designed to make audio management easier during Adobe Connect webinars – among other things!
- Use Adobe Connect to drive engagement and put on a great event!
- Use Click&Meet to quickly manage the audio side of things!

In this blog, we’re going to explore the five reasons Click&Meet provides the ideal companion for Adobe Connect webinars:
- Simpler Participant Audio Management
- Better Lobby Experience
- Enhanced Pre-Event Discussions
- Expanded Recording Capabilities
- Advanced Use Case Opportunities
Adobe Connect Webinars & Click&Meet: Better Together
In the following sections, we’re going to consider how Click&Meet helps to make Adobe Connect webinars even better. But don’t think of it as a bad review of Connect.
We see the whole thing as a wonderful package: Adobe Connect & Click&Meet are better together!
Simpler Participant Audio Management
Adobe Connect
Adobe Connect came up with a reliable solution for managing large numbers of participants: Lecture Mode. When Lecture Mode is on, all participants are muted. This suits the use case well, as many webinars feature single lecturers who give detailed presentations. The Q&A and Chat Pods, of course, cover audience participation needs.
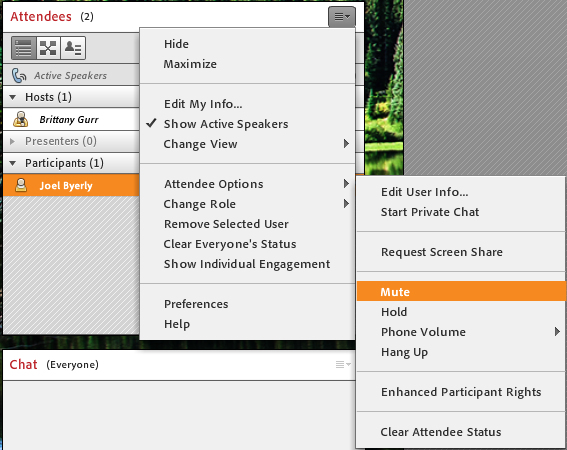
Muting individuals in Adobe Connect is simple. During the event, you select an attendee, click on their name again, and the menu that appears will feature a mute option at the bottom.
Connect also allows individual users to be disconnected. But this is a multi-step process:
- Select the individual
- Select the menu in the top right corner (pod options)
- Scroll down to “Attendee Options”
- Then click “Hang Up.”
While these features are nice, certain organizations are looking for simpler participant audio management. That’s why they use Click&Meet.
Click&Meet
Click&Meet introduces both simpler management and greater control.
Simpler Management
While the Lecture mode is effective, it’s not visible in the immediate interface. You have to find it in the Audio Tab.
Click&Meet took an audio-centric approach and placed the Mute-All feature at the top of the interface! It’s obvious to spot – even for new users.

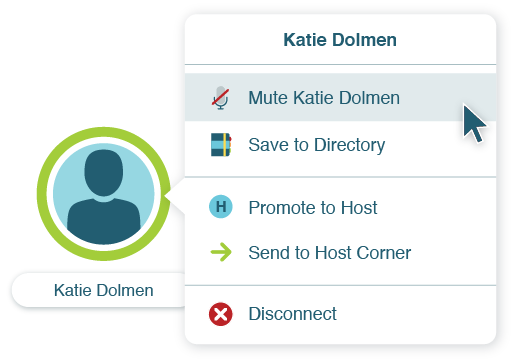
Managing individuals’ audio in Click&Meet is also easier. Avatars stand in for participants, and hosts can right-click on a single avatar to mute them or disconnect them. Two clicks and done.
Greater Control
Along with being able to manage participants by avatars, Click&Meet introduces several features that enhance control.
- Avatars are equipped with talk status indicators (muted, talking, or listening) that help you understand what’s happening.
- Participants can be sorted by their talking status so you can quickly ID disruptive callers.
- Callers can be pulled into the Host Corner as needed by a host. The Host Corner serves as a separate area to chat with callers without being heard by the larger group.
These various controls put users in the best position to manage the audio dimension of every Adobe Connect webinar!
Better Lobby Experience
Adobe Connect
The Lobby experience in Adobe Connect is vital to webinars. It provides a space for interactions with participants before the webinar starts. You can run polls to learn about your audience and start chats to drive excitement for the event.
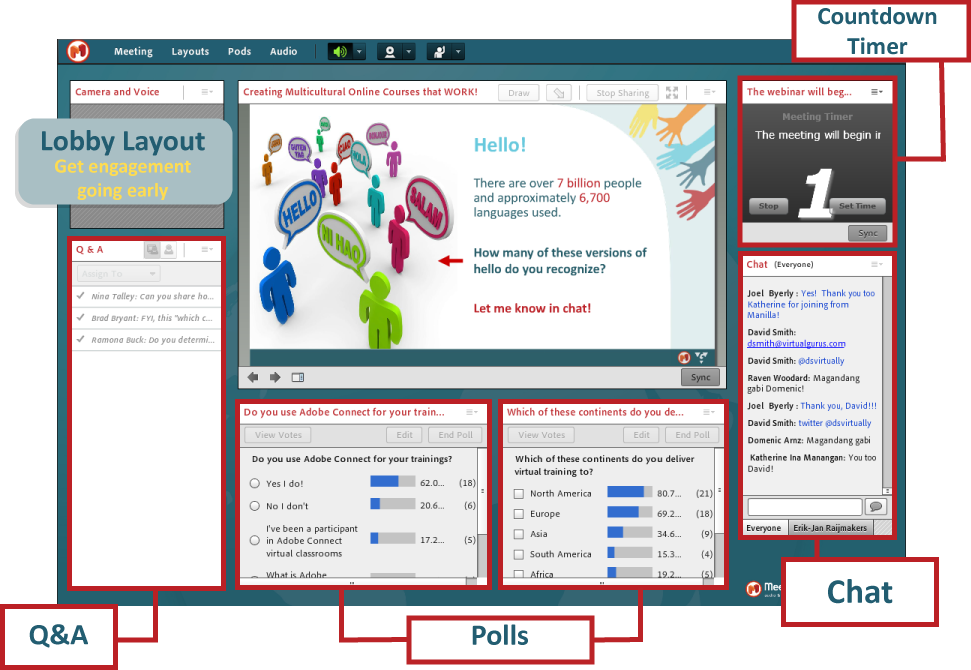
Example of a Lobby layout in Adobe Connect.
We should mention, too, that Lobby’s are unique to Connect. Most other platforms offer no equivalent. People who show up for a webinar in another platform five minutes early might find themselves staring at a blank screen and message reading, “The webinar will start at X time.” That’s no fun!
For all of its awesomeness, Connect lobbies don’t offer hold music.
That’s where Click&Meet comes in!
Click&Meet
Click&Meet helps you avoid dead air and participant confusion. The interface allows for users to add– wait for it – hold music to their Connect lobbies! It may seem like a small thing, but a little music can help visitors orient to the room.
Not only does Click&Meet offer hold music, there are 11 different music options. And standby message prompts are available! All of these options help you further shape the unique experience of your webinars.
Selecting the hold music you want is easy.
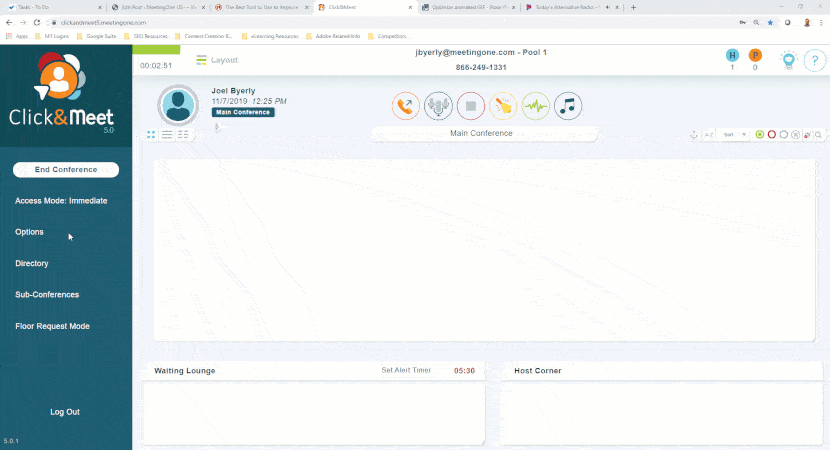
- In the left column of the Click&Meet interface, select Options.
- A new window will appear. You will see “Room Music Options” drop-down.
- Pick the one that best suits you! (I went with “Jazz” for my room. Who doesn’t love a little bebop?)
Turning on and off hold music is as easy as muting everyone. A music note icon sits at the top of the interface. You select it, and your hold music turns on. Select it again, your hold music turns off! Simple to enable, yet the effect is tremendous.
Enhanced Pre-Event Discussions
I want to share a quick story with you. A few years back, I was attending a Product webinar with a partner of ours. They do a great job putting on informative events, but in this instance, I arrived a bit too early (15 minutes to be exact).
Sadly, the team was still hashing out some points of emphasis they wanted to hit. I bet you can guess what the problem was. I could hear everything they were discussing.
While they weren’t sharing bad news or anything like that, it was still a surprise to be exposed to the conversation. You don’t want to be caught in that situation as a webinar host!
Don’t accidentally spoil your amazing Adobe Connect webinar with so simple of a mistake!
Adobe Connect
If there’s one shortcoming of Adobe Connect, it’s the lack of space for Hosts and Presenters to talk once the room is opened. Sure, these groups can text chat in the Presenter Only Area. And hopefully, they’ve gone through enough dry-runs that everything will go smoothly. But sometimes you have to make last-minute changes. Talking through them is often easier.
In theory, you could jump into a Connect breakout room. Participants won’t hear you as you hold a conversation. But this limits your ability to monitor the Lobby and edit other Layouts with Prepare Mode.
That limited access to the Lobby restricts your opportunities to drive engagement with waiting attendees!
This is one of those instances where Click&Meet alleviates the problem altogether!
Click&Meet
Like Adobe Connect, Click&Meet offers sub-conference rooms off the main room. These rooms are isolated from eavesdropping participants.
It’s easy to move presenters into sub-conference rooms and just as easy returning them to the main conference room.
- Open sub-conferences rooms using the button on the left column.
- Define the number of rooms you need then launch.
- You can then drag-and-drop your speakers into the sub-conference room.
- By closing out the feature, everyone is returned to the main room!
As you can imagine, this process is simple yet effective. When our marketing team has put on webinars in the past, I was often tasked with managing pre- and post-event conversations. I found the Click&Meet interface easy to learn and use!
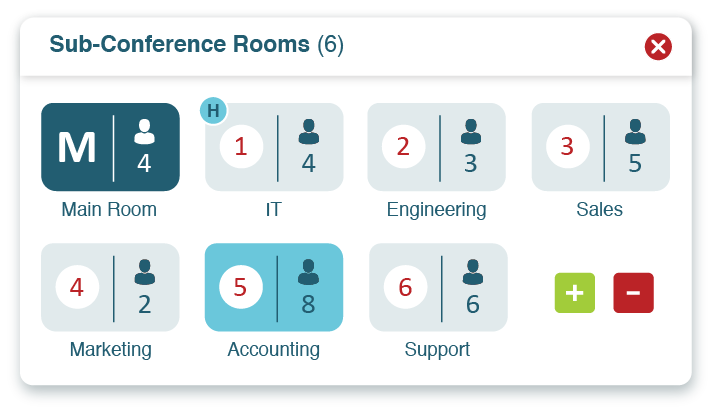
Alternatively, you can associate Speaker Codes within Click&Meet before an event. These codes will move speakers who use them into sub-conference rooms automatically.
While you chat in the sub-conference room, you can steer engagement within Adobe Connect! Have your cake – and eat it too!
We host pre-event discussions in Click&Meet before every webinar we put on.
Lastly, it’s important to note that Click&Meet sub-conference rooms work well for post-event conversations, too. It’s even easier to use the second time around. When you open the sub-conference rooms, the speakers and participants placed in a room earlier will automatically be returned to that room! Very convenient!
Expanded Recording Capabilities
Adobe Connect
Recordings are an important part of Adobe Connect webinars. The interactive elements they maintain in HTML make the on-demand content that much more valuable. Good recordings are critical.
Unfortunately, recordings are unavailable in Connect when it comes to breakout rooms. While many webinars will not require breakout rooms, some will. Connect by itself will not record breakout room conversations. Those breakout rooms may provide important discussions that should be recorded!
Thank goodness for Click&Meet.
Click&Meet
Click&Meet (or really MeetingOne Audio) covers your bases on this front. Just as users are moved into Adobe Connect breakout rooms, they are moved into C&M sub-conference rooms. Breakout Room conversations are then recorded in Click&Meet for later review.
Click&Meet also serves as a back-up to Adobe Connect recordings. If something is wrong with the Connect recording audio, Click&Meet/MeetingOne Audio is synced up to ensure there will be audio for your webinar recordings.
Advanced Use Case Opportunities
Adobe Connect
How do you plan to hold oral Q&A sessions? While certain webinar hosts choose to limit audio interactions, some may desire to field questions over the air – and not just in the Q&A pod.
In Adobe Connect, this involves:
- Individuals with a question selecting the “Raise Hand” status.
- A notification will appear for Hosts asking to approve someone with a hand raised to talk.
- If approved, the participant will be unmuted to ask their question.
- Once they’ve asked their question, the host must again mute them.
![]()
If you do not approve someone, they will receive a notification from Adobe Connect indicating they’ve been not been approved. It’s a little harsh.
That solution works, but it could be simplified. Again, Click&Meet steps in to make your life easier!
Click&Meet
The process for holding town-hall-style Q&A sessions is much more comfortable in Click&Meet. Much easier and much more encompassing.
In Click&Meet, you open the Floor Request Mode:
- Select the “Floor Request Mode” button in the Left Column.
- The Q&A space will appear with an open queue.
- At the same time, our audio system will explain how participants can move into the queue.
- The Floor Request Mode will then organize participants based on when they dial-in.
As a Host, you can sort through all the participants with questions and decide who will lead off. Sorting is super easy, and you have multiple options:
- Drag-and-drop
- Move participants up and down
- Skip callers
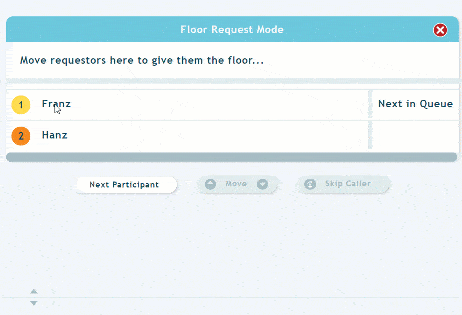
When you’ve settled on who’s going to ask questions, you bump up the first person. They will then be able to ask their question. Once their question is answered, you can move them out of the queue. The best part: They are automatically muted when they leave the queue!
If you have to end the Q&A before everyone has a chance to ask their question, you select the red X in the corner. The queue will close and everyone will return to the main line. They won’t get a notification their chance to ask a question has been rejected.
With Click&Meet, you can hold flawless verbal Q&A sessions. Adobe Connect won’t be affected whatsoever.
Pair Adobe Connect with Click&Meet Today!
We have customers who love the pairing of Adobe Connect with Click&Meet. They depend upon hosting large, online events that run smoothly. They need these events to come of as professional as possible. They picked Adobe Connect because they appreciated the immersive quality and robust engagement tools! They paired Connect with Click&Meet for all the reasons we’ve mentioned above.
If you find yourself needing a bit more control during your Connect webinars, Click&Meet may be the ideal tool for you!
Start a conversation with our Product Specialists!
They know both Connect & Click&Meet – and they’re ready to create a solution based on your needs!