Have you ever attended a web conference (online meeting, virtual training, webinar, etc.) where the leading speaker’s webcam feed was glitchy and the audio was coming in choppy?
“There…when we consider our debt…….. However…….a new business vision……we can only hope……….. Great! Any questions?”
Uh…. maybe…
These annoyances often tie back to bandwidth issues. You would imagine that in the US, where internet speeds now average 50 Megabits per second (Mbps) download & 10 Mbps upload, issues during web conferences wouldn’t keep occurring! Yet, they do.
According to the FCC, download speeds of 4 Mbps should suffice for video conferences. From our experience, though, avoiding these common glitches requires more than that minimum.
Bandwidth requirements first and foremost depend upon the number of people attending. The more attendees, the more bandwidth you need. If it’s just you and a few other people in an online meeting only using webcams, sure, you can get away with a few Mbps. Hosting a 1,000+ attendee webinar that features chats, polls, screen sharing, and downloadable content, on top of webcams, you’re going to want more bandwidth.

We would suggest you plan for 5-10 Mbps per 100 participants for online meetings. For virtual training and webinars with thousands of participants, you need business-class high-speed internet topping 50+ Mbps, both download and upload. (Test your speed here.)
No matter what your capacities are, bandwidth issues are bound to spring up. There will be a time you accidentally exceed your bandwidth. Or, your participants with lower bandwidth capacities wind up having issues. Exceed the capacity and you can expect latency issues. Delayed or glitch-ridden video feeds, slow upload for screen sharing, and time-consuming content download.
Here at MeetingOne, we’ve hosted dozens of webinars with hundreds of attendees. To avoid bandwidth issues, we’ve learned a few tricks for online meetings, virtual training, and webinars.
Understanding Bandwidth Issues
What is Bandwidth?
Before we dig into bandwidth issues, it’s probably best if we understand what bandwidth is.
Bandwidth generally refers to how much information per second can be transmitted through an internet connection. A larger bandwidth allows you to pass more information through a connection, more quickly.
Understanding bandwidth then breaks down into download and upload speeds.
- Bandwidth download speed reflects how much information can be transferred from the internet to your computer. Receiving a chat during a web conference, for example, requires more download than upload.
- Bandwidth upload speed reflects how much information can be transmitted from your computer to the internet. When you screen share, you use more bandwidth uploading information than downloading.
Managing Bandwidth Issues
Managing bandwidth during web conferences generally comes back to several features: broadcasting a webcam feed, screen sharing, and videos. Other features do contribute. Chats, polls, Q&A features all add to the total bandwidth consumed.
Like we said above, participants have the biggest impact upon bandwidth issues. Each person takes up their own bandwidth and then adds to download & upload speeds for certain features. For the total bandwidth your features take up, you then have to add in more for the number of attendees. A good rule of thumb is to expect each user will take up 50 Kilobits per second (Kbps) or .05 Mbps.
To help you better understand the minimum amount of bandwidth you will need, I tested the most important features in my Adobe Connect room – webcams, chats, polls, you name it. I cleared out my room entirely of “Pods” and then began testing each feature in isolation. (My empty room, in which I was the sole participant, had a minimum requirement of 48 Kbps download & .008 Kbps upload, or .048/.000008 Mbps.) My purpose was to determine the minimums you should expect from certain features.
The below graph charts my average rates for different virtual room features (download/upload):
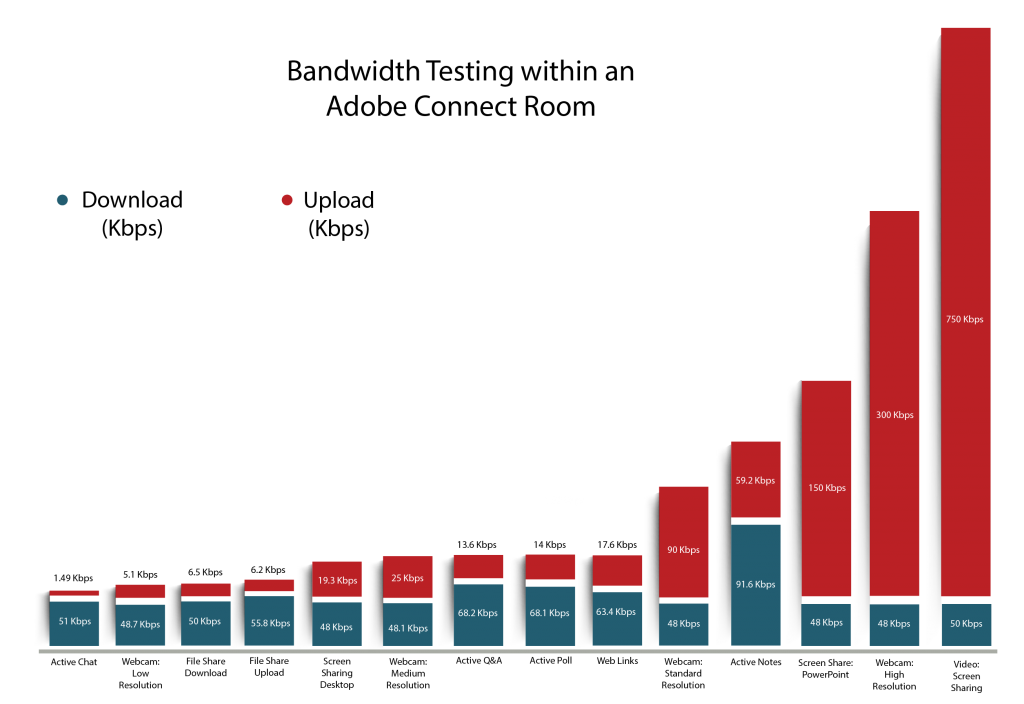
Although many of the listed features consume little bandwidth on their own, add hundreds if not thousands of attendees to your event, and things can get bogged down.
Strategies for Conserving Bandwidth
Like I mentioned above, MeetingOne has hosted numerous Adobe Connect webinars. Several topped well over 500 participants. Although we have the bandwidth capacity in our office to help manage these large events, we’re still in the habit of practicing bandwidth conserving practices.
Referring to the graph above, which 3 factors took up the most bandwidth? That’s right: Webcams, Screen Sharing, and broadcasting a Video (via a screen share tool).
We have a few proven strategies for better managing all three.
Best Webcam Practices
#1. Intermittent Use
The simple fact is that don’t always have to broadcast your webcam. When you share videos or other rich content formats, don’t use a webcam at the same time.
Why?
 Well, first of all, there’s no point in having your face (even if you have an amazing smile) on the screen while your participants focus on a video or other file type being shared – they won’t be paying attention to you. Secondly, your webcam will sap bandwidth unnecessarily, which can lead to latency issues with the video.
Turn off your webcam when it’s not needed. Or, as you can do in Adobe Connect, customize your room layouts without webcams during stretches of the presentation when they aren’t needed!
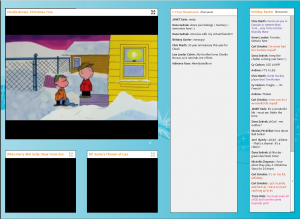
During our “2015 Virtual Holiday Party” (webinar) we had a section where we shared several videos (see the 6:45-minute mark). We had planned for this, and we’d designed our Adobe Connect room to exclude webcams while sharing the videos. Doing so allowed us to stream the videos without worrying about bandwidth issues.
(Unfortunately, some webinar platforms, such as Zoom, default to turn everyone’s webcam when a session starts. Not ideal if you’re trying to save bandwidth.)
#2. Pictures
Maybe pictures don’t quite have that “interactive” feel you want during a webinar or online training. But when it comes to saving bandwidth, it’s a completely justifiable option. Sharing pictures requires much less bandwidth than does a webcam.

To reduce bandwidth during “Help Subject Matter Experts Deliver Strong Virtual Trainings,” our speakers, Vernon Roberts and Laura Pierce from Evoke Virtual, used pictures in place of webcam feeds. Doing so kept a smiling face on the screen without affecting our internet capacities.
Using pictures only works if you have the right platform, specifically Adobe Connect. You need to be able to run multiple screen shares so that a picture can be uploaded into one.
#3. Pausing Your Webcam
If you’re going to lead a screen sharing heavy session, one of the best options you have is to pause your webcam.
Pausing your webcam works well because it allows your speaker or host to quickly start and stop live broadcasts, without affecting continuity. All the while, you save on bandwidth.
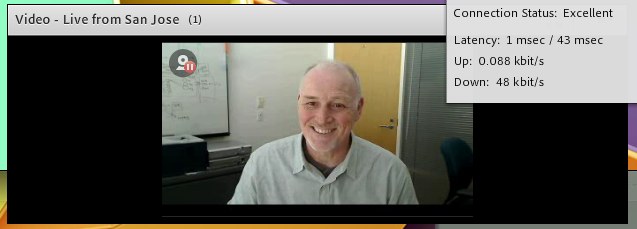
During a recent webinar we hosted with Adobe, “Discover the Difference: Adobe Connect Webinars,” the speaker and web conferencing guru, Peter Ryce, demonstrated just how effective pausing a webcam can be. While showing the various settings for a webcam, Peter compared the bandwidth fluctuations when live streaming a webcam versus pausing it. When he paused the webcam, the amount of bandwidth being used dropped dramatically. It was basically negligible. (See the picture below.)
#4. Selecting the Right Resolution
When it comes to web conferencing events, there really is a tremendous benefit to having a webcam broadcasting. A friendly face in the virtual setting does a lot to humanize the space. That said, it’s advisable to configure your webcam resolution to reflect the needs of your session to avoid bandwidth issues.
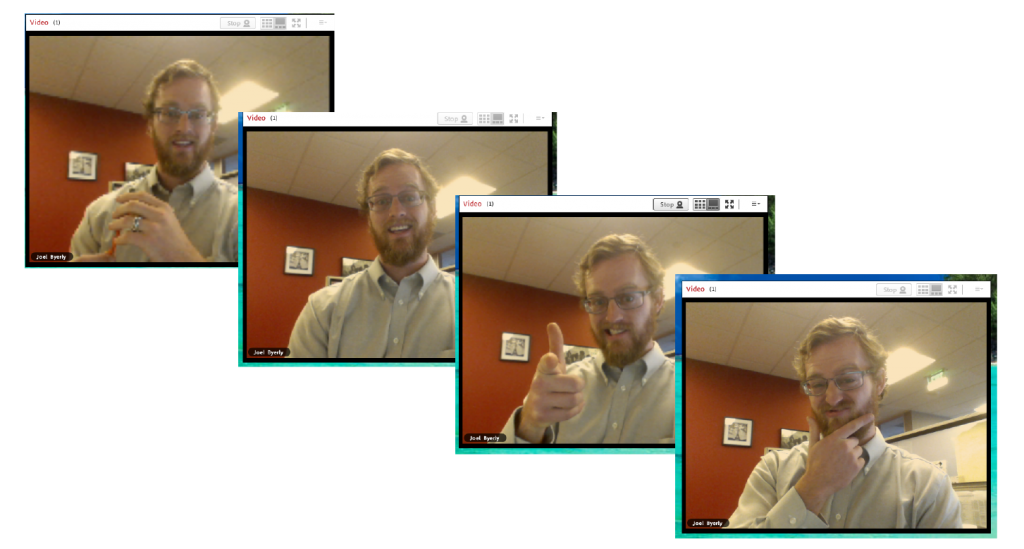
Webcam resolution can vary a lot. Low-quality resolution tends to be heavily pixelated and choppy. Going “HD” provides a vivid image and superb continuity, but it uses up more bandwidth. (See the example below. Each image reflects one of the settings available in Adobe Connect. The farthest left shows the lowest available option at 120p. At far right, it’s high-quality 480p.)
Selecting the right webcam resolution depends upon your web conferencing use case. Whether you’re using your platform for online meetings, virtual trainings, or webinars, should factor into your choice.
- Online Meetings:
Online meetings tend to be more about simulating face-to-face interactions from afar. Consequently, you want near HD quality resolution, or minimally 480p. Using this higher resolution will add clarity to your webcam feed, which will give your online meeting a more personal feel. Keep in mind that you may have several webcams on during these meetings, though.
- Virtual Training:
The resolution you need depends upon how you conduct your trainings. Sessions that feature videos or are more information heavy may not require a “front and center” webcam. In those instances, you can get away with placing a webcam off to the side and going with a lower resolution level. Doing so will save bandwidth.
On the flipside, if you want your audience to feel personally engaged, it may be wise going with the highest resolution option available.
- Webinars:
Webinars tend to be more lecture oriented. Of course, there’s always room for chats and polls to drive engagement, but most of the time the PowerPoint presentation is going to hog the screen. In those instances, you can get away with tucking your webcam into the corner of a room and going with lower resolution.
If possible, it’s ideal to go with a higher resolution no matter the event.
One of the features I’m particular to in Adobe Connect is the Video Settings option. The setting allows me to select what level of resolution I want to use. From within your Adobe Connect room, all you have to do is:
- Click on the Meeting tab in the top left corner.
- Scroll down the drop-down menu and select “Preferences.”
- A new window will appear. Click on “Video” in the menu at left.
- The video settings will appear. Under “Video Quality,” you can adjust the resolution.
Some platforms, such as GoToMeeting, only accommodate different resolutions if you have the right supported webcams.
Better Screen Sharing Strategies
Eliminating bandwidth issues related to screen sharing is actually quite easy. You just have to get out of the “screen sharing mentality.” (Oh, the irony!)
A common practice during web conferences is to screen share PowerPoints, documents, or other files, right from your desktop. As we can see above, screen sharing a powerpoint takes up a sizeable amount of bandwidth on the upload side (at the high end, 325 Kbps)
There is another way to present documents during web conferences without having to simply screen share. The secret: Upload your documents to your virtual room before your event. The benefit is pretty apparent. If you’ve already uploaded the information, your web conferencing platform isn’t having to actively capture the data and upload it.
In Adobe Connect, there are two options for doing this:
- Upload content via Adobe Connect Central (the admin portal for Adobe Connect)
- Upload content straight into your Adobe Connect room
Both options are quite straightforward. From Adobe Connect Central, select the “Content” tab near the top left. On the new page, you will find a button that says “New Content.” Click the button. You will now be able to upload content to the admin side of your virtual room. (Use this resource to determine what content you can upload into Adobe Connect.) 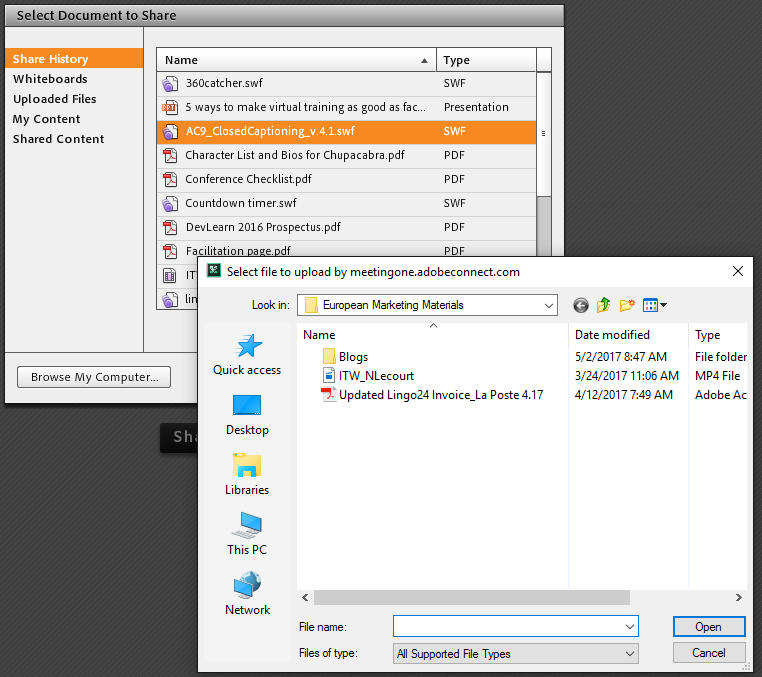
If you’d rather just upload content straight into your room, you can do so by using the Share Pod. When using the Share Pod, you have the option to share your screen immediately or select an option from the drop-down menu. Go to “Share Document” in the menu. A new window will pop up, and you will see the option to browse your computer. And just like that, you can upload files into your room. Easy-peasy.
Uploading content into Adobe Connect can save a significant amount of bandwidth. After uploading a PPT into my Share Pod, I actively shared the presentation and my bandwidth requirements were low: averaging 50/3.3 kbps. Compare with the above – 48/150 kbps!
(Keep in mind that with Zoom, you cannot upload files into your room. Everything you share must be done via the screen share. Sorry…)
Effectively Sharing Videos
Screen sharing almost always leads to substantial bandwidth use. Whether you screen share a PowerPoint or a video, you’re going to use up unnecessary amounts of bandwidth.
So, it makes sense that uploading videos – like documents and presentations – would save your capacities. For Adobe Connect, the process is essentially the same. MP4 videos can be uploaded into the Share Pod and then played. (Or you can upload them into Adobe Connect Central.)
Let’s compare. When I screen shared a 6-minute MP4 video, my upload rate spiked at 1,250 Kbps (or 1.25 Mbps)!
Then, I played an uploaded video. The average I was seeing for download/upload was 2.22/0.088 Kbps. Say what?!?! I couldn’t believe that was correct, so I tested again. Slight uptick: 3.44/0.088 Kbps. Now, as I mentioned earlier, I was the only person in my room. That does skew the bandwidth figures. But the simple fact remains: uploading a video into your room as opposed to screen sharing saves a ton of bandwidth. A ton.
Back-end Management
If you put on many webinars or large online events every week, it may be in your organization’s best interest to set a standard rate of bandwidth consumption.
You can do so within Adobe Connect Central easily. Select the Administration tab; choose “Compliance and Control;” then pick the “Share Settings” option below. Next, scroll down to Room Bandwidth Settings. From here, you can set bandwidth usage levels.
Let’s look at the below screenshot. It was pulled right out of Adobe Connect Central.
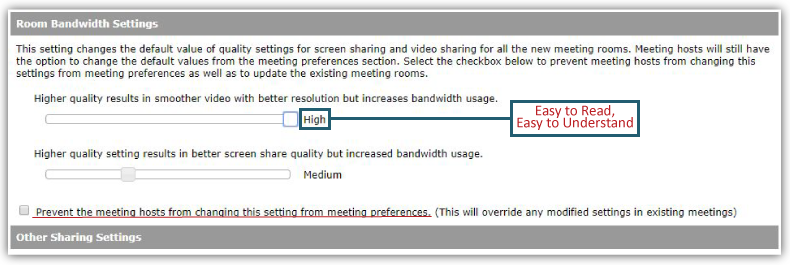
What’s important here? First of all, it’s easy to change your bandwidth usage. Simply use the slider to select the resolution quality you want for video and screen share! Once you pick the resolution quality you want, it will be set across your account. All users will fall under the umbrella.
I really like this aspect because the “values” are completely understandable. I immediately know what “High” or “Low” means when talking about video quality. Imagine if you had to try to work with a slider that only had numeric values to pick from? Should you pick 1.5 Mbps, or 2 Mbps? Adobe makes it easy to avoid this confusion!
Secondly, by checking the box in the lower left corner, you can effectively ensure those bandwidth settings will be fixed for every room. If you don’t select the box, room hosts are able to set the bandwidth standards for their rooms.
While not every organization will need to set certain bandwidth standards, some will appreciate the simplicity of doing so.
Resolving Bandwidth Issues
How you address your bandwidth needs is entirely dependent on your use case. If you’re hosting huge webinars with 1,500 people, you’re certainly more likely to face bandwidth issues, even if they are just small ones. But if you take these suggested steps to eliminate unnecessary consumption when and where possible, your large online event should run smoothly!

On the flip side, small online meetings with only a few dozen shouldn’t cause bandwidth issues (unless you have a low-end consumer connection). Take advantage of higher resolution cameras and greater flexibility with screen sharing!
Of course, the best strategy you can employ for cutting down on bandwidth is to shut down other programs and applications that suck bandwidth, particularly streaming services (Netflix, Youtube, etc.).
Whatever you do, be mindful of how your web conferencing platform’s bandwidth capacities and what bandwidth issues may arise.
If you want a platform that has been designed to help users save bandwidth, you need Adobe Connect.

Paired with the industry’s best customization tools, and you can’t beat the opportunities Adobe Connect presents to host tremendous web conferences!