Webinar Dry Run Agendas Pt. 4: The Day-Of Webinar Checklist
 The time has come to hold your killer webinar. All of the work you’ve put in, the three webinar dry runs you’ve rehearsed, all the storyboarding and revisions, finally comes to bear fruit.
On this final day, it remains ever critical to be diligent. With your dry runs complete, you won’t need an agenda for preparations. But you should have a day-of webinar checklist.
To help you through your final hurdle, we’ve prepared a day-of checklist for your webinar.
We outlined all the things you need to review, along with an assortment of helpful reminders that will ensure your webinar goes off without a hitch.
(Don’t forget to get some help from a webinar producer! Their technical expertise can help you manage many of the tasks on the checklist below!)
Start running through your webinar checklist at least 30 minutes before the event begins.
The Day-of Webinar Checklist
-
Call into Conference Line & Move Speaker and Production Team into Sub-Conference Room
-
Disable Doorbells
-
Place All Participants on Mute
-
Audio & Webcam Testing
-
Have the Speaker Change Their Q&A Pod View to “Show Only Questions Assigned to Me”
-
Ensure that the Most Recent Takeaway is Uploaded
-
Briefly Run through Slides to Ensure They are Functioning Properly
-
Take Participants off Hold 15 Minutes before Start Time
-
Activate Countdown Timer
-
Start Recording
-
Move Host and Producer into Main Audio Room and Begin Presentation.

How to use this Webinar Checklist
There are a lot of tasks you have to complete before your webinar. To help you prioritize your pre-event planning, the tasks, and their order, are explained below in our webinar checklist.
Please note that many of our suggestions anticipate the use of integrated audio. We recommend you always use integrated audio. (What can we say? Integrating audio into a webinar can help in a number of unexpected ways, and we always use it for our webinars.)
#1. Call into Conference Line & Move Speaker & Host into Sub-Conference Room
The first thing on your webinar checklist to do is start the call.
(Note: We’ll be using MeetingOne’s optimal AudioOne and Click&Meet as examples for how this will work. AudioOne is MeetingOne’s solution for audio conferencing and integrating audio into Adobe Connect. Free with AudioOne is MeetingOne’s visual interface, Click&Meet.)
- Launch your Adobe Connect room and begin integrated audio 30 mins before your live event – have it dial out to you for easy access. If you’ve set up your “Place Participants on Hold” in our previous posts, you won’t have to worry about your audience joining prematurely.

- Log into your Click&Meet virtual conference room to move into a sub-conference separate from your audience.
Within Click&Meet, move your speaker, production team, and yourself into a sub-conference room, either by right-clicking on their avatars or dragging it into the chosen room. Sub-conference rooms are isolated from the main line. Being isolated ensures that your pre-webinar discussions won’t be heard when participants are allowed to join the webinar.
If you decide to just go with VoIP (or really – computer microphone/speakers), you won’t have an isolated line to facilitate your pre-webinar talks. So, you’ll wind up having to keep participants on hold for longer. The unfortunate consequence here is your audience will have less time to interact with your Lobby. (Also, audio quality may be reduced depending on individuals’ bandwidth.)
#2. Disable Doorbells
Each time a participant is dialed-out to with integrated audio, a doorbell will chime to note their arrival. You don’t want that to happen if you have a few hundred participants who will utilize the dial-out option. That much chiming will become a huge distraction? How do you avoid this issue?
Simply disable the doorbells of your audio platform!
- In Click&Meet you can do so quite easily. On the bar above the main window, you’ll find a “Bell” icon. Turn your room doorbells on and off by clicking on this icon. Alternatively, you can toggle your doorbell on and off by entering the command Ctrl+Alt+b or with your phone by pressing *47#.
#3. Place all Participants on Mute
Engagement is an essential ingredient of successful online events. But having participants interjecting their thoughts during your webinar is not desirable.
Make sure you’ve muted all participants on your main conference line.
- In Click&Meet you have a few options to mute all participants. You can either click the microphone icon with a red bar running through it, at left. Or, you can use the command Ctrl+Alt+m. Or, lastly, use your phone and press *4#. Anyone who calls in will automatically be muted.
From within your webinar room, make sure you’ve also disabled participant microphones. Check out our short tutorial that can help explore your webinar room’s audio options.
#4. Audio & Webcam Testing
 Getting the technical aspects of your webinar sorted out is an absolute must. And it has to happen early.
- Test your audio. Start audio for your webinar in the virtual room while participants are on hold. With MeetingOne as your provider, we can provision your virtual rooms so they are automatically integrated with audio.
- Ensure that the audio of your conference line is coming through your virtual room.
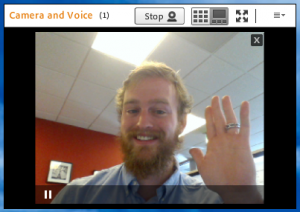
- If the audio is good, test your webcam to make sure the connection is strong and glitch free.
After you’ve tested your webcam, don’t stop sharing quite yet. Have your speaker smile for the camera, then pause their webcam. Doing so places a friendly face in your Lobby!
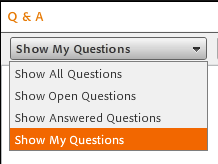
#5. “Show Only Questions Assigned to Me”
 Depending on your topic, you may wind up having a lot of questions directed to your team. Make sure to direct the right ones to your speaker.
In the Presenter Only Area of Adobe Connect, the questions being asked in the Q&A Pod will be displayed. As a host, you can assign questions to those team members assisting you, including your speaker. Make sure each person sets their Q&A Pod status to “Show My Questions.”
When you come upon a question that would be best answered by your speaker, assign it to them. If they have set their view of the Q&A Pod to “Show My Questions,” they will see only the questions you think they should answer.
#6. Ensure that the Most Recent Takeaway is Uploaded
Make sure the latest version of your event takeaway – with all those meticulous corrections you’ve made – has been uploaded into your virtual room.
In Adobe Connect, make sure you’ve placed it in the File Share Pod. To ensure the takeaway is correct, highlight the file then click “Download.”
#7. Briefly Run through Slides to Ensure They are Functioning Properly
With only 30 minutes available before the webinar to review everything, you no longer have the time to take a detailed look at your slides. The purpose of this final review is to make sure each slide functions correctly.
#8. Take Participants off Hold 15 Minutes before Start Time
In the second part of this series, we shared with you a step-by-step guide for placing participants on hold with Adobe Connect. Doing so allows you to keep your attendees out of your virtual room before the webinar starts.
About 15 minutes before your webinar is scheduled to start, remove the“Hold” and let your participants enter. Fifteen minutes gives your attendees time to interact with the Lobby you’ve developed. Their interactions can provide you insights into understanding of the topic you’re presenting.
Removing the “Hold” is done through the same process as placing it.
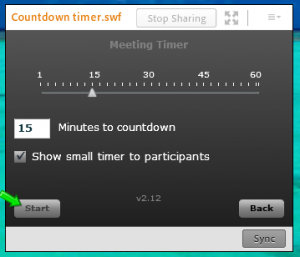
#9. Activate Countdown Timer
Once you’ve opened your webinar to your eager participants, activate the countdown timer. The timer, as previously discussed, keeps your audience informed to the amount of time they have until the webinar begins.
#10. Start Recording
When the scheduled time of your webinar arrives, go ahead and start recording your event. Always record your webinars. Webinar recordings should be provided to your attendees for their review—it’s an important aspect of your webinar thank you email.
#11. Move into Main Audio Room and Begin Presentation
Recall that at this point, you’re not on the main conference line for the webinar — you’re still in a sub-conference room. Don’t forget this, or your speaker will be leading a presentation…and no one will hear them but your team.
When you are ready to begin your presentation, the last thing on your webinar checklist will be to move your speaker, your team and yourself into the main audio room of Click&Meet. You can simply drag-and-drop participants, or you can close out the sub-conference room, and they will automatically be returned to the main audio room
Let your stellar webinar commence!
Make Sure Your Next Webinar is a Success!
We hope you’ve found these agendas and discussions to be helpful! Holding a faultless webinar dry run is the key for hosting successful webinars. And as we’ve said a lot, your dry runs depend upon solid organization. The key is having prepared a quality webinar agenda.
We would love to help you through the technical aspects of your webinar. We can provide formal training of Adobe Connect Webinars‘ platform, and we can assist you on the technical side of producing your webinar. Contact your MeetingOne Product Specialist to discuss Production Services or Training, or use this Form.
Review the overview and host a knock-out webinar!
